
Assembling Flat-pack Furniture
December 21st, 2006
Just like I can’t understand people who are unable to cook due to not being able to follow recipes, I also don’t understand why people have difficulty assembling furniture. It is true sometimes instructions are unclear, incomplete, or just plain wrong. But the rest of the time people just don’t apply themselves.
Pre-amble
Now it is eighteen years later and I’m willing to conceded sometimes the instructions are not clear, but usually you can muddle through. Also not all flat-pack furniture is created equal. I removed the Ikea tag but their furniture has lasted twenty or more years for me, whereas other competitors I’ve bought online have proven much less sturdy or given me the wrong parts.
In 2024, I decided to overhaul my blog’s taxonomy that necessitated editing hundreds of old blog posts. While editing them I tried to fix busted links and anything else that looked terrible. A lot of my old home improvement posts had a lot of small inline images floating all over the place and although I’d like to blame WordPress, the fact I now have a much bigger monitor may be the true root cause or at least a contributing factor.
Although it is eighteen years later, my mom still has these shelves, they still look good so although they were work and not the cheapest options they came out well. Of course they haven’t been assembled and disassembled and reassembled like some of my Ikea furniture which is now with me in Calgary, but sometimes you should definitely pay more for furniture if you can it will last longer.
Improving my mom’s home
I always managed to get an A in shop and home ec when I was a lad. And perhaps instead of going to university I could have become an apprentice electrician as I worked in a electrical supply and lighting store when I was in high school. But after I finished my BSc. degree and was living and working in Vancouver at Global Village Consulting I joked if software development didn’t work out I could always get a job assembling Ikea furniture.
My apartment, particularly the front room had several pieces of Ikea furniture. I also assembled a lot of the office furniture at GVC which was also from Ikea. A running joke was due to my inability to sleep and my ample amounts of Ikea furniture I was Edward Norton’s character in “Fight Club”. I always maintained I was John Cusack’s character in “High Fidelity”.
Tools of the Trade
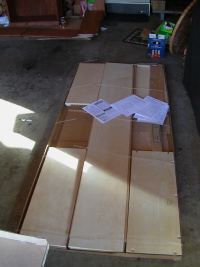
Anyway recently I had to dust off the old multi-headed screwdriver, hammer, pliers, Allen wrenches, wood glue, sandpaper, and paintbrush to assemble some flat-pack furniture. This time it isn’t from Ikea but from Home Depot. It is actually made by Whittier Wood Products of Eugene Oregon. Those are all the tools besides a measuring tape and a pencil that I can recall using to assemble shelves, desks, CD racks, and cabinets over the years. No power tools are needed even hammering of nails or screwing in wood screws that haven’t been pre-drilled is rare.
These shelving units are actually part of a larger home improvement project that has been ongoing for many months here at Deep Bay. It even has involved real contractors. In fact my cousin Dave who is a carpenter is going to swing by tonight to help us fix and rehang a few doors. I even have to cook dinner.
Why not better fasteners?
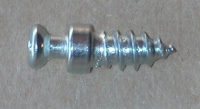
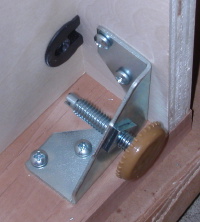
My biggest complaint, and it is a familiar one to my more loyal blog readers, is the screws that are included with the furniture. They are wood screws but they are not Robertson heads. It gets worse, they provide some kinda custom manufactured screw and locking mechanism which I’ve seen before and the instructions refer to as the “Cam-lock system” they are also referred to as Rafix Cams and Rafix Bolts. Surely if you are going to make such an elaborate system you could at least spend the extra pennies to get a decent screw driver head. The Allen wrenches that Ikea prefers are far preferable to Phillips head screws and bolts.
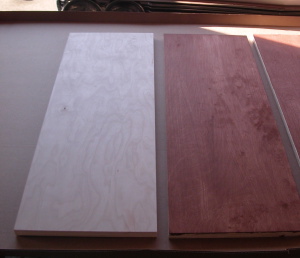
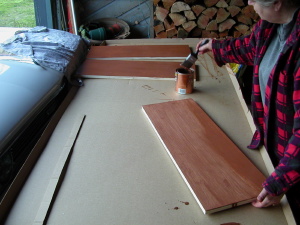
Testing Stains
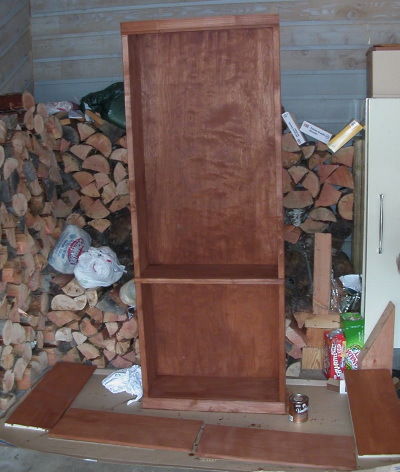
Despite many times having the screw head slip out of the screw, not to mention stripping and rounding off, I assembled two 772W Wall Units. My mother and sister were suppose to get finishes when they picked up the shelves in Courtney but despite already picking out a color in the Nanaimo Home Depot somehow they came home with three little sample packets of stain. The instructions advise finishing the wood before assembly, but we didn’t. I did test the three ketchup packets of stain on the bottom of the bottom shelf of the first unit. And after again choosing a color of stain my mother and sister went off to the local hardware store in Bowser.
Although they carried the line of stain, they didn’t seem to have the color we’d tested and decided upon. So another color and possibly another entire line of stain was used. I assembled first one unit and then it was stained. Then I assembled a second unit the next day. Eventually we put two coats of stain on all but the bottom of the removable shelves.
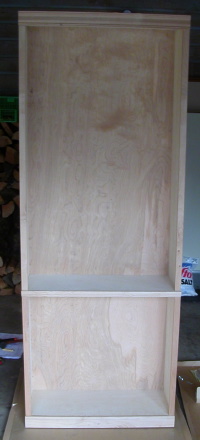
Some Assembly Required
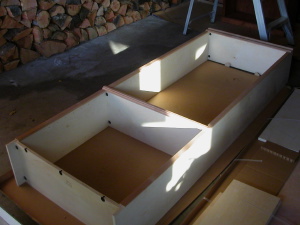
The units can be built by one person using just a screw driver, a mallet, and a tape measure in probably under two hours per unit. This now seems like a miracle and a major endorsement after I spent considerably more time and effort more recently. You could possibly get by with just the screw driver. The most difficult parts are putting on the thin piece of wood that is the back panel. This is where the instructions advise using a measuring tape. They provide a lot of small wood screws to secure the panel which is pre-drilled to the shelves which aren’t pre-drilled. You could make a mistake here and even though I was careful it is possible I might have screwed in one of the 24 screws a little too crooked. It isn’t really noticeable once stained, but it would have cost me a few marks in shop class.
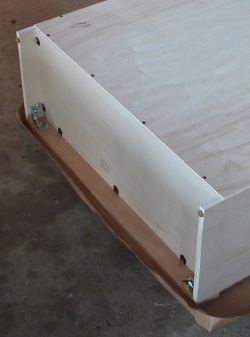
Screwing Screws
The other place where it was extra tough to screw in the screws was the bottom of the unit. Two braces with adjustable legs are provided. They go in the front two corners. It is a little too tight to use a normal sized drill and nothing is pre-drilled so after the 24 wood screws on the back your skin and wrist are going to get a further workout putting these on. I actually already had a blister on my palm from the back of the first unit, but I don’t think my skin is super tough.
These units are suppose to end up in one of the bedrooms we repainted, carpeted, replaced the light fixtures, the window dressings, etc. etc. I think I took some before pictures but not many. I never set out to write a blog on home improvement. Now eighteen years later it appears I never got around to updating this blog post with pictures of the finished shelves installed. I must have some on my MacBook Pro and possibly posted them in another blog post.
Fresh Photos and Even More Text
Although I swore I wasn’t going to do it, I just went through years of photos on Apple’s Photo program on my MacBook Pro looking for a picture of these completed shelves with actual books on them. Of course I eventually found one, but I also found another home improvement project I did for my sister which I carefully took pictures of but never wrote a blog post about. This time it was dog agility training obstacles.
I put some of those pictures on Flickr too along with pictures of her actual dogs even some action shots of her best dog Huuna jumping though the obstacles. Huuna has her own webpage and Flickr album, so the pictures may already be online, but not that I can see in either of those spots. The in-progress construction photos are likely not online. That project was my own design and I used power tools, all vintage and dusty in my grandfather’s shop, I swear I documented it somehow or my sister did. That may have been the last time some of those tools were used in that shop. I know I replaced a fuse in one of them.
More DIY and Home Improvement
My mom finally got some professionals, but I did more home improvement projects around her house. While looking for pictures of these finished shelves I found the railing I installed at her front door. That has last eighteen years or so but I never uploaded any pictures of that project in 2024. I documented it, even counter sunk some bolts. During the coronavirus I put some LEDs on some old Ikea furniture. Eventually I built another flat-pack desk and shelf. That desk got LED lights too. The desk eventually got those adjustable arms you can use to hold multiple computer monitors.
All this might not be very relevant, but unlike the dog agility obstacles and various other projects around my mom’s house I wrote blog posts about assembling more flat-pack furniture. Likely because I wanted to recommend or complain about the products I bought online or because Google occasionally sends me traffic for these old blog posts. Alas in 2024 I have become really unpopular and I don’t think updating eighteen year-old posts about assembling flat-pack furniture is what the search engine optimization and social media gurus would recommend.
As I mentioned above if I really built these shelves in two hours by myself that is a pretty glowing endorsement. Because although my back and knees are worse, I still know how to use a screw driver, hammer, saw and pliers and I seem to recall spending a lot more time on more recent projects with arguably less impressive results.
Kids these days are big on LED lighting, I always figured my mom or sister would ask me to do some for them but it still hasn’t happened.

Final Rambling Thoughts
What I’ve learned today is on my much bigger monitor some old blog posts render terribly. I still don’t seem to have a CSS trick to fix it, I should ask in a forum perhaps. But the brute force solution is to either remove images or to add more text. Posts written more recently such as those after my trip to Scotland have a lot of images, but most of them are on Flickr and are centred. Floating everything to the right was cool in the early 2000s but in this day and age with everyone using smart phones and iPads centered images are probably more than significant. I could also look at using widgets to make a gallery. Editing these old blog posts was not supposed to be this much work. Though in my heart of hearts I knew it would be, that is why I avoided it for half a dozen years.
Subheadings help, anything that adds whitespace for the images to float around helps. Editing these old home improvement blog posts has really become an exercise in typing. Supposedly there are new modern ways to align the images and even resize them. But this blog post is so old the images are not in the WordPress core system or database. My DIY workaround is to just start using Flickr more, even uploading older crappier photos just so I can share an image with less stress as Instagram is not the way to go for bloggers and neither is Facebook. You want to avoid walled gardens.
YouTube is where all the home improvement and DIY action is as it is easy to monetize and a picture may be worth a 1000 words but an instructional video is probably even more valuable to someone up a ladder with just their smartphone. I thought editing the post about refinishing the garage door took a long time, this one may have taken longer. In the end I think I’m just going to have to stop and make dinner. You can leave a comment if you want, I think eighteen year old home improvement blog posts is not where the spammer action is.
This entry was originaly posted on , it was last edited on and is filed under: DIY, Hobbies, & Interests and tagged: Fight Club, High Fidelity, Home Improvement.


I love reading these type of post. How people gradually shape interior furniture is real and inspiring.
That post is pretty old, but I do have a lot of experience assembling flat-pack furniture either from Ikea or some other manufacturer. Maybe I should have started a home improvement blog back in the day.
New to this blogging thing, so bear with me.
Your comments about flat pack furniture caught my eye. I recently read a couple of articles siting the frustrations with flat pack furniture. Let’s see – can I link to those – Agonies of Flat Pack Furniture and Tired of Flat Pack Furniture?
I’d love to get into staining or doing decorative finishing, but I haven’t been able to invest in quality unfinished furniture yet. I’ve still got hand-me-downs! Oh I just thought of some shelves I have – perhaps I could practice on those. I’m such a perfectionist that it takes me a while to take up a new hobby! For example, I love photography, and everyone says I should do it professionally, but I really just don’t think I’m good enough!
Anyway, thanks for letting me share . . .
Only one of your links is still working. I am not sure I would let people throw three links into the comments of one of my blog posts in 2024 but at least pornographic domain squatters haven’t taken them over.